Overview
Why Build Statically?
For the Windows operating system, the simplest way to produce an application is the .exe file. An entire program can be contained inside a single file and it can easily be launched by clicking on it. Many applications written using Microsoft’s tools will produce files of this type – simple executables that are easy to pass around, require no installation, and run easily.
Unfortunately, though Qt does produce .exe files, these applications usually have .dll dependencies. This means that instead of copying over a single file, the user must copy over a directory of supporting files (or install them). The bigger tragedy is that it doesn’t have to be this way: Qt can absolutely produce an entire application that resides entirely within a single .exe file but it can be difficult and time consuming to achieve this.
This guide is to help software developers, some who may not have much experience with Windows development experiment, build and release Qt software statically so that it resides in a single file.
Windows Development Machine
For the purpose of this guide, I am doing all of my development inside a Windows 11 virtual machine that is hosted in Linux using KVM and QEMU. I prefer to do my development inside of VMs whenever possible as development software will occasionally run into problems that can be fixed most easily by just deleting everything and starting over.
This virtual machine has the following attributes:
- 16 GB RAM
- 400 GB disc space
- 8 CPUs
- Bridged network
It has been updated to the latest Windows version and has the appropriate Linux drivers installed (virtio win guest tools).
Compiler Notes
In this guide I will be standardizing on Microsoft’s MSVC compiler. The purpose is to build standard Windows-compatible code and MSVC does a fine job with that.
I am also building and using both the debug and release libraries. You may not need the debug library, your intention may be to just build a release version, but having access to the debug library will be useful if your product glitches in production. You’ll have the tools in this environment to run it in debug mode using the static library.
Licensing Notes
The Qt libraries and tools are free to use for the purpose of developing open source software. In this guide, I identify myself as an open source developer and use the open source license. This guide may be useful to someone who using doing commercial development but the license type must be set correctly.
Installation
Before Qt applications can be built, I recommend installing the following software packages.
Git
Though not strictly necessary, I strongly recommend installing Git on the local system as it will be used to pull down the most current version of the Qt library as well as example applications.
Git for Windows is available at https://git-scm.com/install/windows
I chose the Standalone Installer, Git for Windows/x64 Setup
During install, I used the default settings:

Beyond that, I chose the following:
- Vim as the default editor
- Let Git decide on the default branch name
- Git from the command line and also from 3rd-party software
- Use the native Windows Secure Channel library
- Checkout Windows-style, commit Unix-style line endings
- Use MinTTY as the terminal emulator
- Merge on git pull
- Git Credential Manager
- Enable file system caching but not symbolic links
Other settings were glossed over because they’re probably not important for this guide.
Qt Creator
It may actually be possible to build Qt applications using only Visual Studio but I’ve always installed and used Qt Creator. If nothing else, it provides a fallback option if things aren’t building in Visual Studio.
For installation, I use the Qt Online Installer (GUI version) located at https://doc.qt.io/qt-6/qt-online-installation.html. A Qt account is required to access the installation file – this account is free for open source work.
Once you are running the installer, you will have to provide your Qt credentials in order to install the software. I affirm to Qt that I am an open source developer.
I want to install Qt 6.11 for desktop development as well as do a Custom Installation:

Since I chose Custom Installation, I want to make sure I also install the following:
- Qt Creator
- Qt (in this case 6.11.2)
- MSVC 64 bit
- Sources
- Additional Libraries? I don’t worry about that since we’ll be building from source anyway
- Qt Design Studio

If you forget anything, you can always go back and re-run the Qt Installation tool again.
Visual Studio
Visual Studio is Microsoft’s professional software development IDE but it is freely available for open source developers. The installer can be downloaded at https://visualstudio.microsoft.com/downloads/.
Visual Studio offers a lot of development options during install but the one you really need is Desktop development with C++:
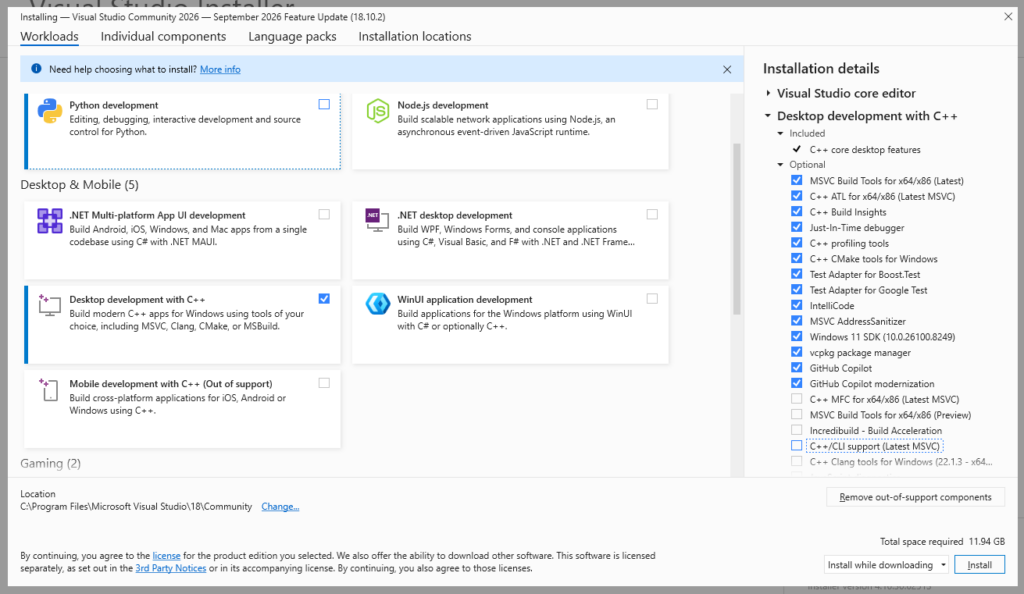
Installation will take a little time.
Once Visual Studio has been installed, we also want to make sure that debugging tools are installed. This can be done by going to Installed Apps then going to Windows Software Development Kit and pressing Modify. Choose Change to be given the feature list, then you can make sure that Debugging Tools for Windows is turned on:

Python
The Qt library is dependent on Python in order to build. The easiest way to install Python in Windows is:
Open the command prompt
Type Python
The Microsoft Store will open with the option to install Python:

Once installation is complete a command window will open with the Python installation Manager configuration helper:
- Yes, configure Windows to allow paths longer than 260 characters
- Yes, configure the global shortcuts directory
- Yes, install the latest Python runtime (for me it is 3.14.7)
Python is now installed and ready for the build process
Reboot
Windows likes reboots so once you have all of the software installed, make sure it gets in at least one reboot.
If you run into any unexpected errors following this guide, go ahead and reboot then as well.
Building the Qt Static Library
Now with all of the appropriate parts installed, it’s time to get the Qt source code and to build the library.
I am going to recommend and use shadow builds here. What that means is that I will by copying the source to a separate directory and then building the library there. I do it this way so that if anything goes wrong during the build process I can just delete the shadow build directory and start over – the source directory remains untouched.
Getting the Qt Source
There are two ways to get the Qt source code: you can copy from the files you already installed when you installed Qt or you can grab the source using git.
| Source Source | Source Size |
| Default Install | 1.06 GB |
| git Essentials | 2.49 GB |
| git Everything | 11.4 GB |
Copy from Install
If you did as I did, you installed a copy of the source when you installed Qt. In this situation, all one needs to do is copy it into a new directory.
So I copied C:\Qt\6.11.2\Src into C:\Qt\6.11.2\Src-build
Git source
It is also possible to just use git to pull the correct source. An nice thing about this approach is that it’s possible to grab the precise version of the git source that you want:
C:\Qt\6.11.2>git clone git://code.qt.io/qt/qt5.git Src-build
Cloning into 'Src-build'...
remote: Enumerating objects: 56036, done.
remote: Counting objects: 100% (54164/54164), done.
remote: Compressing objects: 100% (17424/17424), done.
remote: Total 56036 (delta 41806), reused 46977 (delta 36054), pack-reused 1872
Receiving objects: 100% (56036/56036), 13.92 MiB | 3.34 MiB/s, done.
Resolving deltas: 100% (42270/42270), done.
Updating files: 100% (3053/3053), done.
A couple of things to note here. First, Qt versions 5 and 6 share the same repository so we’re cloning Qt 5 deliberately. The second thing is that in order to get the correct version, we much change to the correct branch. As I am working with version 6.11.2, that is the branch I will switch to:
C:\Qt\6.11.2>cd Src-build
C:\Qt\6.11.2\Src-build>git switch 6.11.2
branch '6.11.2' set up to track 'origin/6.11.2'.
Switched to a new branch '6.11.2'
Then you must initialize submodules. My approach is to just initialize the essential submodules using the following command (note that you must use x64 Native Tools Command Prompt here to make cmake available):
C:\Qt\6.11.2\Src-buildgitess>init-repository.bat --module-subset=essential
+ git config --get initrepository.initialized
+ git config remote.origin.url
+ git submodule init qtrepotools qtbase qtimageformats qtshadertools qtsvg qtlanguageserver qtdeclarative qtactiveqt qttools qttranslations qtquicktimeline qtquick3d qtmultimedia qttasktree qtwebsockets qtwebchannel qtserialport qtpositioning qtwebengine qtdoc qtqa
Submodule 'qtactiveqt' (git://code.qt.io/qt/qtactiveqt.git) registered for path 'qtactiveqt'
Submodule 'qtbase' (git://code.qt.io/qt/qtbase.git) registered for path 'qtbase'
Submodule 'qtdeclarative' (git://code.qt.io/qt/qtdeclarative.git) registered for path 'qtdeclarative'
Submodule 'qtdoc' (git://code.qt.io/qt/qtdoc.git) registered for path 'qtdoc'
Submodule 'qtimageformats' (git://code.qt.io/qt/qtimageformats.git) registered for path 'qtimageformats'
Submodule 'qtlanguageserver' (git://code.qt.io/qt/qtlanguageserver.git) registered for path 'qtlanguageserver'
Submodule 'qtmultimedia' (git://code.qt.io/qt/qtmultimedia.git) registered for path 'qtmultimedia'
Submodule 'qtpositioning' (git://code.qt.io/qt/qtpositioning.git) registered for path 'qtpositioning'
Submodule 'qtqa' (git://code.qt.io/qt/qtqa.git) registered for path 'qtqa'
Submodule 'qtquick3d' (git://code.qt.io/qt/qtquick3d.git) registered for path 'qtquick3d'
Submodule 'qtquicktimeline' (git://code.qt.io/qt/qtquicktimeline) registered for path 'qtquicktimeline'
Submodule 'qtrepotools' (git://code.qt.io/qt/qtrepotools.git) registered for path 'qtrepotools'
Submodule 'qtserialport' (git://code.qt.io/qt/qtserialport.git) registered for path 'qtserialport'
Submodule 'qtshadertools' (git://code.qt.io/qt/qtshadertools.git) registered for path 'qtshadertools'
Submodule 'qtsvg' (git://code.qt.io/qt/qtsvg.git) registered for path 'qtsvg'
Submodule 'qttasktree' (git://code.qt.io/qt/qttasktree.git) registered for path 'qttasktree'
Submodule 'qttools' (git://code.qt.io/qt/qttools.git) registered for path 'qttools'
Submodule 'qttranslations' (git://code.qt.io/qt/qttranslations.git) registered for path 'qttranslations'
Submodule 'qtwebchannel' (git://code.qt.io/qt/qtwebchannel.git) registered for path 'qtwebchannel'
Submodule 'qtwebengine' (git://code.qt.io/qt/qtwebengine.git) registered for path 'qtwebengine'
Submodule 'qtwebsockets' (git://code.qt.io/qt/qtwebsockets.git) registered for path 'qtwebsockets'
Alternatively, you can bring over all of the submodules but be warned, this will result in a much larger build than I am doing here:
C:\Qt\6.11.2\Src-build>configure.bat -init-submodulesPerforming the Build
We now assume that the Qt library source code is in a shadow build directory (in this example it is c:\Qt\6.11.2\Src-build). We will also need to define the directory where to compiled library will live; in these examples I will be using C:\Qt\static\6.11.2_MSVC_64 .
Make sure that you have enough space for this process. My build directory (with just the essentials) weighs in at 122 GB and the static library is 19.6 GB.
We will be building using the MSVC compiler that was installed with Visual Studio. To facilitate this, we will be performing all of the builds using x64 Native Tools Command Prompt (this can be found by searching the start menu.

I then enter the following commands:
C:\Program Files\Microsoft Visual Studio\18\Community>cd \qt\6.11.2\Src-build
C:\Qt\6.11.2\Src-build>configure.bat -static -debug-and-release -prefix C:\Qt\static\6.11.2_MSVC_64 -platform win32-msvc -opensource -confirm-license -nomake examples -nomake tests -skip qtwebengine -static-runtime -force-debug-info -optimize-size
C:\Qt\6.11.2\Src-build>cmake --build . --parallel
C:\Qt\6.11.2\Src-build>ninja install
A few remarks on the options that I handed configure.bat
- -static – Executable binary should contain all necessary Qt modules and plugins
- -debug-and-release – As mentioned above, we’re going to build both the debug and release versions so that we can diagnose any problems we come across
- -prefix – This is the directory where the static library will live
- -platform – This should be set to win32-msvc because we’re compiling with MSVC; this supports 64 bit
- -opensource and -confirm-license – As stated above, this library is only usable for open source work
- -nomake – We’re not building the examples or the tests
- -skip – We don’t want to make qtwebengine because it’s big and complicated and doesn’t play well with debug-and-release
- -static-runtime – With MSVC, this changes the compiler’s runtime flag from /MD to /MT
- -force-debug-info – Doesn’t really affect the final build but makes debugging a little easier
- -optimize-size – Makes the .exe a little smaller at a potential performance cost
In my virtual machine, this build takes many hours to complete. Once it is done and the libraries have been installed, it makes sense to delete the build directory in order to free up 100+ GB of space on your machine.
Configuring the IDEs
Once the static library has been built and installed, it is necessary to configure the Integrated Development Environments to point to it.
Configuring Qt Creator
In order to make the static build library in Qt Creator, you must go to Edit -> Preferences -> Kits.
First check the Compilers tab and confirm that the Visual Studio MSVC compilers are available:

The go to Qt Versions and press Add… to add the library we just built. Specifically we need to point it to the location of qmake.exe which for me is c:\Qt\static\6.11.2_MSVC_64\bin\qmake.exe.

Now go to the Kits tab and press Add to add a new kit. Here is what I filled in:
- Name: Desktop Qt Static 6.11.2 MSVC 64bit
- Compiler: Visual Studio Community… (amd64)
- Debugger: Auto-detected CDB (64 bit version) (this option requires Debugging Tools for Windows to be installed, see above)
- Qt Version: Qt 6.11.2 (6.22.2_MSVC_64) (mouse over the options to locate the static build)
Then I pressed Apply to save:
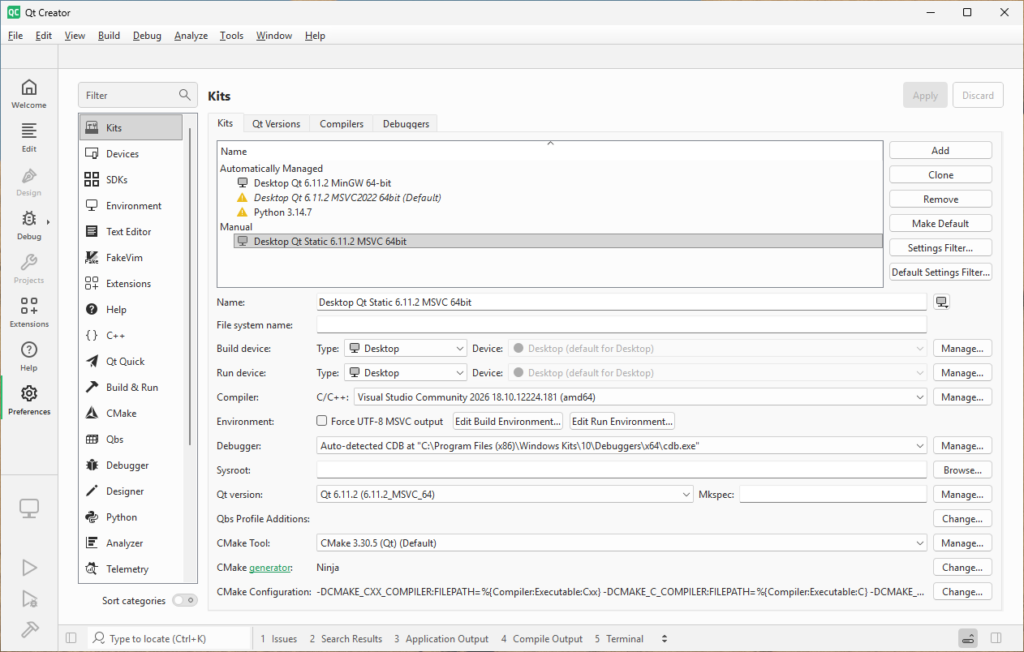
Configuration is complete, we can now build and debug static applications using Qt Creator.
Configuring Visual Studio
The easiest way to build Qt projects in Visual Studio is to install the Qt extension. To do this, in Visual Studio, navigate to Extensions -> Manage Extensions… then install Qt Visual Studio Tools:
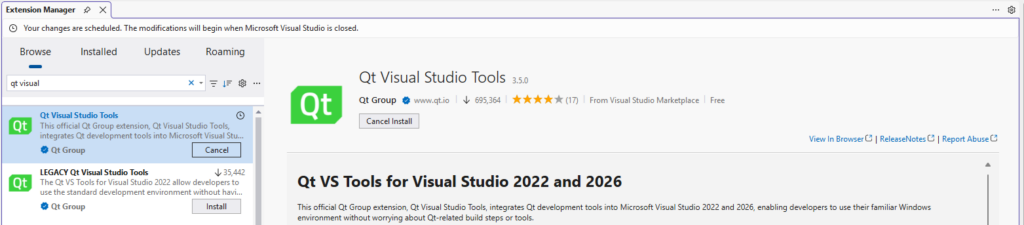
Once installation is complete, close Visual Studio and re-open. You will see a message asking you to select a Qt version to use for development:

In the options menu, I choose Autodetect so that Visual Studio can find all of the Qt libraries, then I select the static library and make it the default:
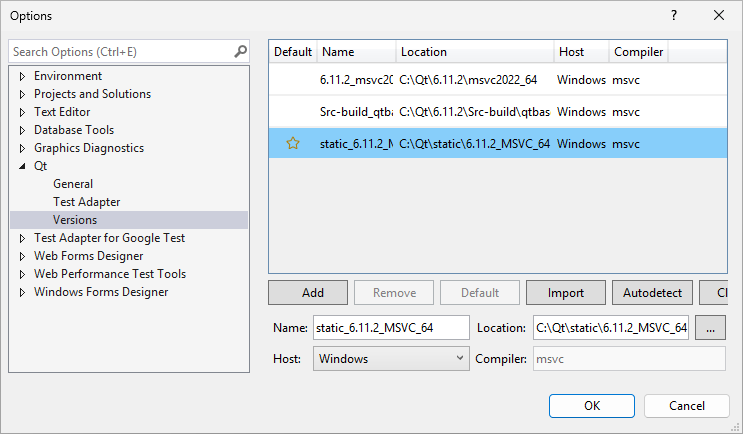
If you need to access those settings in the future, they can be found under Tools -> Options -> Qt.
Building Qt Statically
Now that all of the pieces are in place, installed, and configured, we can finally build some static .exe files!
The below examples explain how to do this using Qt Creator and Visual Studio. Both IDEs are capable of building and debugging Qt projects but it is not recommended that you use both IDEs on the same directory at the same time. If you do need to use both, I recommend developing in separate directories and keeping the code synced with Git.
Qt Creator Calculator Build
Qt provides a number of wonderful example applications and Qt Creator makes accessing these examples very simple – just look under the Examples tab. For this demonstration, I’m going to choose the Calclatr application:

I choose the application which causes Qt Creator to load it. The Configure Project menu immediately appears. In order to guarantee that the builds are static, I’m going to uncheck the default configuration (Desktop Qt 6.11.2 MinGW 64-bit) and check both the Debug and Release options for the Desktop Qt Static 6.11.2 MSVC 64bit:

Then I press Configure Project in the lower right to open the project. At this point I can easily go to Build -> Build All Projects for All Configurations. I navigate to C:\Qt\Examples\Qt-6.11.2\demos\calqlatr\build\Desktop_Qt_Static_6_11_2_MSVC_64bit_Release to see that there is now a statically generated calqlatr.exe file that can be run on any Windows machine.
If you even need to remove the build and configuration files for Qt Creator, simply delete these following directories from the source:
- .qtcreator
- build
Visual Studio Calculator Build
Now let’s build the Qt example calculator application using Visual Studio. We open Visual Studio, select Open a project or solution, and then direct it to open c:\Qt\Examples\Qt-6.11.2\demos\calqlatr\CmakeLists.txt. This causes Visual Studio to load the project:
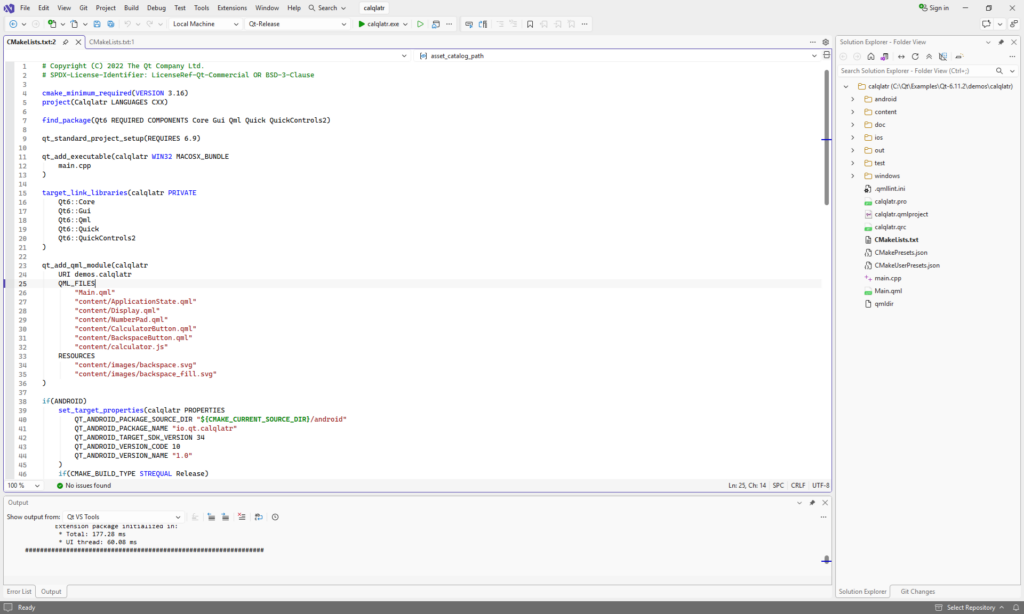
Of course, we can run and debug it here but if you want to get a release build, change the combo box at the top of the screen from Qt-Debug to Qt-Release, then Build -> Build All. The compiled file will be located at c:\Qt\Examples\Qt-6.11.2\demos\calqlatr\out\build\release\calqlatr.exe.
If you even need to remove the build and configuration files for Visual Studio, simply delete these following directories from the source:
- .vs
- out
- CMakePresets (file)
- CMakeUserPresets (file)
Final Notes
I’m leaving out WebEngine because it dramatically increases the complexity to build (it apparently doesn’t use cmake).
Many aspects of Qt use OpenGL to display graphics. In theory, so long as the OpenGL defaults are maintained, a statically compiled Qt application will use an alternative translator so that the application can be viewed in environments where there is no graphics accelerator (such as using a remote viewing tool or a virtual machine). In practice, a few Qt elements really do require graphics acceleration to run (such as the Qt movie viewer). If the goal is universal compatibility, it is important to test the applications inside virtual machines and remotely.
Conclusion
I hope the information in this document will give developers the freedom to create more standalone, click-to-run applications and utilities. For most smaller utilities, it really is possible to publish the entire thing as a single .exe.
Leave a Reply